Pests can cause health issues by carrying bacteria, contaminating food and spreading diseases. They can also damage the environment and strip insulation in buildings.

Biological pest control uses naturally occurring substances to repel or kill pests. Examples include nematodes that infect certain pests or garlic sprays to ward off aphids and other insects. Contact Ben’s Pest Control for professional help.
The best way to keep pests away from your home is to prevent them from having access to food, water, and shelter. This can be done by sealing cracks and crevices, regularly cleaning up discarded debris and garbage, and eliminating sources of standing water like birdbaths, kiddie pools, and clogged gutters. Another important preventive measure is to monitor your property regularly, and take action promptly when you see signs of pests.
Keeping your property pest-free is key to protecting it and preserving its value. Various pests can cause significant damage to homes and businesses, compromising structural integrity and contaminating belongings. In addition, many pests carry diseases and allergens that can be harmful to human health. For example, rodent droppings can contaminate food, and cockroaches are known to carry bacteria and trigger asthma attacks and other allergies.
Regular pest control services can prevent infestations from getting out of hand. Depending on the type of pest and severity of the problem, service providers can use various methods to eliminate them. These may include physical barriers like traps, nets, and screens that prevent pests from entering or staying in a certain area, and mechanical control measures such as sweeping, vacuuming, and dusting that physically remove pests and their eggs.
In addition to these preventive measures, it is important for students and faculty to report any pest sightings using the Facilities Management Service Request system. This allows a licensed pest control manager to identify the area and take prompt action. When using pesticides, the smallest possible amount should be used to ensure that only targeted areas are treated. Large collections can also be protected from pests by freezing or low-oxygen treatments, though these are not suitable for all specimens.
A well-maintained landscape can help reduce the likelihood of pest infestations as it makes it harder for pests to reach buildings through open doors and windows. It is important to trim bushes and trees, and regularly mow the lawn. In addition, it is crucial to eliminate standing water, as pests such as mosquitoes breed in these environments.
Eliminating Infestations
The first step in pest control is to recognize the factors that encourage infestations. Identifying the problem will help determine the best management strategies. For example, rodents thrive in messy environments, and birds are attracted to waste products and water sources found in garbage, bird feeders, or compost piles.
Eliminating the sources of food and shelter for pests is one of the most effective preventive measures. Leftover crumbs, rotting food debris, or trash cans that are not properly sealed can attract pests, as can cracks and crevices in walls and door frames. Keeping the outside of buildings and structures free of clutter, mowing grass, and weeding can also deter pests from accessing indoor spaces.
In addition, cleaning up spills and removing garbage promptly will reduce the likelihood of an infestation. Keeping a well-stocked toolbox of materials that can be used to seal small gaps and openings is an important part of any pest prevention plan. Caulk, steel wool, and weather stripping are ideal for sealing small gaps around windows and doors. These seals will not only prevent pests from entering, but they can also reduce air leaks and improve energy efficiency.
Other key prevention steps include ensuring that outdoor garbage cans are tightly closed and that compost heaps are turned regularly to speed up the process and aerate the pile. Properly stored foods, especially pet food and grain, can also discourage pests from invading homes.
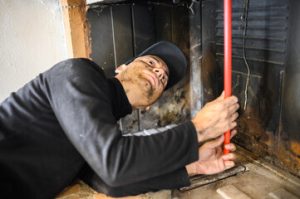
If a pest infestation does occur, the next step in pest control is to eliminate the infestation. This may involve treating the area with a pesticide or bait and trapping or removing the pests. If an infestation is too serious for self-treatment, a professional pest removal company should be consulted.
Whether the infestation is a nuisance rodent like a mouse or a pesky insect like an ant or bee, pests can cause significant problems for home and business owners. Not only do they damage property, but they can pose a health hazard to those who live or work in the affected areas. Pests carry disease-causing bacteria and viruses, including Salmonella, E coli, and respiratory infections.
Detecting Infestations
Pest infestations can wreak havoc on property, create health risks and cause structural damage. Unfortunately, many homeowners don’t know they have a pest problem until it is too late. Recognizing the signs of pest infestation is crucial to preventing pests from becoming a serious issue, and pest control services can help with prevention and detection.
Signs of a pest problem often include droppings, chewed items, odors and other physical evidence that the pests have been in the area. For example, cockroaches leave a distinctive musty odor that gets stronger as the infestation grows. Rodents produce a similar, ammonia-like odor as they search for food and shelter in crawl spaces and attics. Chewed electrical wires and gnawed furniture are also common indicators of rodent activity, while termite damage to wood and wood structures can be hard to spot until the damage is severe.
Other indicators of a pest problem may be more subtle, but just as important. Faint scratching or scurrying sounds in the ceiling or walls, particularly at night when pests are most active, can signal their presence. Additionally, a foul smell coming from the kitchen or bathrooms may indicate a roach or rat infestation.
The most effective way to detect a pest problem is to surprise the area with a visual inspection. For example, open up cabinets and drawers that have been closed for a while, or peek into unused rooms. A flashlight can be helpful to help you see better in dark areas. In addition, opening the door to your shed or garage to discover a stack of wood piles, or overturning rocks in your yard can reveal pests that like to hide in the dark.
While preventive measures are the best way to keep pests away, even the most conscientious homeowner can end up with a lingering infestation from time to time. It is important to understand the signs of a pest problem and know what to do about it, whether you are using pest control or pest management techniques. In either case, professional pest management experts can assist with detecting, eradicating and monitoring pest problems to ensure that they do not return.
Monitoring Infestations
Monitoring is the process of collecting data on pest populations and plant damage to inform decisions on control methods. It functions like an early warning system, allowing you to take action before the problem gets out of hand. This is done by routine inspections, insect identification and use of indicators (sticky traps, pitfall traps, light traps). Also important is tracking environmental conditions such as weather and food or harborage availability. Another key step is recognizing natural enemies that keep pests in check, and determining whether or not those organisms are working.
Routine pest management and prevention services offer a number of benefits to homeowners. They include:
Health and Safety: Pests can carry disease-causing pathogens and allergens that pose a threat to human health and safety. Pest control prevents these threats from causing harm, while preserving the value of your home and protecting you and your family.
Peace of Mind: Pests can cause significant damage to homes and their belongings, including furniture and electronics. Regular inspections and treatments prevent this damage, allowing you to enjoy your property without worrying about costly repairs or replacements.
Preserves Property Value: Pests can damage the appearance of your home, reducing its value and making it harder to sell or rent. Regular pest control treatments protect your home from damage, and prevent future infestations by removing the conditions that attract them.
If you have a pest infestation, it’s important to act quickly to prevent the problem from worsening. Contact your local pest control experts for an initial inspection to determine the extent of your problem, and a customized treatment plan to get rid of it. This may include both interior and exterior treatment, depending on your specific needs and the severity of the pest infestation. Regular follow-up visits help to ensure that the problem has been fully eliminated and to identify any new pest problems that need to be addressed. These steps, together with preventive measures, can provide a comprehensive approach to pest control that reduces reliance on chemical pesticides. For more information about Integrated Pest Management, please visit our blog.