Mold Remediation Salt Lake City is a process that brings harmful mold levels down to a safe level for your home or business. It can be a lengthy and expensive process, depending on the type of mold.
The first step is to assess the situation. This involves inspecting different areas of the building, including hidden spaces and air ducts.
While fire and water can be devastating to any property, the most damaging force that a home or office can face is mold. Besides the structural damage it can cause, mold has been known to cause numerous health problems. For example, inhaling mold spores can trigger allergic reactions that irritate the eyes, skin, nose, throat, and lungs of sensitive individuals. These allergies can range from hayfever-type symptoms to more severe respiratory conditions.
The primary resource for mold growth is moisture. Therefore, preventing the presence of mold growth involves identifying and correcting sources of moisture. This includes checking for any leaks and ventilation issues, as well as repairing or replacing damaged materials. In addition, cleaning up existing mold and fixing the underlying issue prevents future mold growth.
Another way to reduce the risk of mold growth is regularly inspecting rooms, especially after rains and storms. This can help spot early signs of mold, such as dark stains on walls or ceilings or a musty smell. Also, if you have fabrics that can mildew, such as cotton, wool, rayon, leather, or woolen textiles, clean them thoroughly before storing. Alternatively, store fabrics in garment bags that have a mildew inhibitor to keep them from growing.
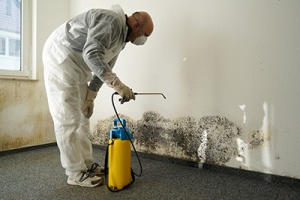
During mold remediation, it is important to isolate the affected area with barriers and seals in order to prevent the spread of mold spores through the building. This is accomplished with a containment barrier, which typically consists of plastic or polyethylene sheeting that is used to block the contaminated area from the rest of the building. Remediators should wear disposable clothing, such as paper overalls or TYVEK suits, during the cleanup process to avoid direct contact with mold. Moreover, a respirator mask is recommended to protect the respiratory system from spores that may be airborne.
Isolating the Area
One of the first steps in a mold remediation project is to isolate the area where work will be done. This will help to prevent mold spores from spreading to other areas of the building, as well as to limit the exposure of remediators and building occupants to mold spores.
This is accomplished by blocking off the work area with plastic sheeting and covering air supply and return vents in the work area. In addition, an exhaust fan should be placed in the work area to pull contaminated air away from the space and vent it outdoors. This will also reduce the amount of dust generated during the cleaning process.
During the isolation process, the extent of the mold infestation is determined, as is the type of mold present. It’s important to determine the type of mold because some species are more toxic than others and can pose a serious health risk for people with allergies, asthma, or weakened immune systems. The source of moisture is identified and corrected, as mold growth typically occurs as a result of excess water or humidity.
When the affected area is isolated, the next step is to start drying and sanitizing. This can be done by using a non-toxic mold removal solution, such as tea tree oil, baking soda, or vinegar. These solutions should be sprayed onto the mold and allowed to sit for about 10 to 15 minutes before being scrubbed with a non-abrasive brush and rinsed.
If the infestation is severe, it may be necessary to remove building materials such as drywall and carpeting. This is a more complicated process that involves the use of highly specialized equipment to sanitize the work area and dispose of the affected material.
Cleaning and Sanitizing
A thorough cleaning and sanitizing is the next step in mold remediation. Moldy surfaces must be sprayed and scrubbed with detergent solutions to remove any mold growth or spores, and then rinsed thoroughly with clean water. If the area is large, a vacuum cleaner equipped with a HEPA filter is often used to prevent the release of mold spores into the air.
It is important to make sure all the mold spores are removed, especially in hidden areas such as behind wall coverings and beneath floorboards. This is because even a small amount of mold spores left behind can cause further outbreaks. It is also a good idea to use a disinfectant or biocide during this stage of the process to prevent the spread of any remaining mold. It is recommended to wear masks, gloves, and eye protection during this stage of the process.
Porous materials like wood, paper, and drywall that have been contaminated with mold should be thrown away. Some items, such as rugs and ceiling tiles, may be too severely damaged to be cleaned. If you are unsure whether an item can be saved, it is best to consult a professional for a full inspection and evaluation before attempting to clean and re-use it.
It is also a good idea to replace any furniture or carpets that have been contaminated with mold. Mold spores can easily penetrate deep into these materials, so they are difficult to completely clean. In addition, if these items are re-used in the future, the mold spores can continue to grow and multiply. As a result, replacing these items is often the best option for homeowners. Once all the contaminated materials have been discarded, all of the affected structures need to be thoroughly dried and dehumidified. This usually takes one to five days.
Drying and Dehumidifying
Mold thrives on moisture, so it’s important to dry and dehumidify any area that was contaminated during the remediation process. It’s also helpful to run mold tests again after the cleanup is complete to ensure that all spores have been removed.
A variety of cleaning and drying methods can be used depending on the type of building material or furnishings affected by the infestation. These include:
Surface Cleaning
Non-porous surfaces such as tiles and glass can often be cleaned with water and commercial cleaning products specifically formulated for mold removal. These products contain chemicals that are more effective at eliminating visible mold and removing hidden spores.
Scrubbing and sanitizing non-porous surfaces can be done with a scrub brush, sponge, or rag dipped in clean water. Using these tools, the surfaces are scrubbed and then rinsed to remove any remaining cleaning solution. Porous surfaces, such as drywall or wood, may need to be sanded or sprayed with an antifungal or antimicrobial agent. This can help remove deep stains and kill any remaining mold spores.
If a mold infestation has spread to other areas of your home or business, you will need to use dehumidifiers and fans to control the humidity and speed up the drying process. It is recommended that you wear personal protective equipment during the cleanup process, including gloves, eye protection, and a mask to protect yourself from breathing in any mold spores. Disposable paper overalls are commonly used, and a full-body suit made of a breathable fabric such as TYVEK(r) is also available. It’s essential to dry the affected areas as quickly as possible to prevent further damage and to reduce health risks for anyone living or working in the property.
Disposing of Moldy Materials
Once all moldy materials have been removed, they must be disposed of properly. This process is a bit more involved than simply tossing them in the trash because the material must be disposed of according to specific guidelines in order to prevent any mold spores from becoming airborne. This may require a professional who knows how to handle and dispose of materials safely and in compliance with regulations.
During this process, all windows and openings are closed to keep out mold spores. A physical barrier, such as plastic sheeting, is erected around the area. Air pressure is also reduced, which further helps to contain the spores. It is important for anyone working on a mold remediation project to wear protective gear, including a face mask and eye protection. The mask should be fitted properly so as to prevent any spores from getting into the person’s respiratory system or eyes.
Building and furniture materials that are contaminated with mold must be placed in sealed, impermeable bags and transported outside of the remediation area. This reduces the risk of mold spores being dispersed during transport to uncontaminated areas. Depending on the nature of the contaminant, it may be necessary to use a HEPA vacuum in order to ensure that all of the mold spores are removed from the item.
Porous materials that cannot be cleaned, such as wooden wall studs, must be discarded. They can, however, be treated with an EPA-approved biocide, which will kill as many spores as possible and make them sterile. Then, they can be taken to a hazardous waste collection facility where they will be handled according to special regulations. It is important to only use certified hazardous waste handlers for this type of work.